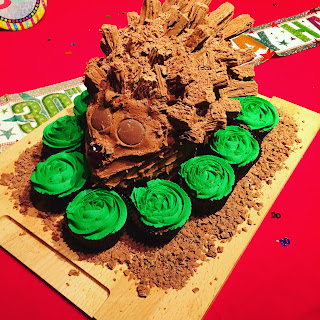
This is my go-to chocolate cake recipe for shaped cakes. It's made with egg whites so it's very strong and easy to cut and shape. It's from this book, Contemporary Cake Decorating Bible. I find it really useful because it has ratios for different cake shapes and sizes, so you can adjust it to suit your own cake tins.
These ratios are for a 7inch cake tin (greased and lined):
- 225g plain chocolate
- 175g unsalted butter
- 115g caster sugar
- 6 large eggs
- 40g icing sugar
- 175g self-raising flour
Step One: Make the Cake
Preheat the oven to 180C (160C fan). Melt the chocolate and set aside to cool a little. Cream the butter and sugar in a large bowl until pale and fluffy. Separate the eggs and add the yolks to the creamed butter and sugar. Now that the chocolate has cooled slightly, add the melted chocolate to the egg yolks, butter and sugar. In a separate glass bowl, whisk the egg whites to soft peaks. (Glass is best for whisking egg whites in). Gradually add the icing sugar to the egg whites.
Sift the flour into another bowl. Slowly fold in a spoonful of egg whites into the chocolate mixture (using a large metal spoon) followed by a spoonful of flour. Repeat until everything is folded in. Gently pour into the prepared tin and bake for about an hour. Test with a skewer - if there is still cake mix sticking to it, bake for another 15 minutes. Once a skewer comes out clean, allow the cake to cool completely in the tin, then wrap in foil and rest overnight before cutting and shaping.
Step Two: Cut and Assemble the Cake
Cut the cake in half and fill with chocolate buttercream. I always use 1 cup salted butter to 3 cups icing sugar for buttercream, plus 2 tsp vanilla extract. For chocolate, swap one tbsp of icing sugar for cocoa powder. Beat the butter until very creamy, then slowly add the icing sugar and cocoa powder until you have a spreadable buttercream.
Go to this website for a full tutorial for assembling the hedgehog cake.
Once you have filled the cake, cut the cake into sections like this:
Step Three: Decorate the Cake
Cover the entire cake with buttercream, then cover with flakes. You will need to cut them to the correct length, so the shorter 'spines' are at the front of the cake, and the longer 'spines' are towards the back. Make the hedgehog face using giant chocolate buttons and a glace cherry!
I used leftover flake crumbs to cover the area between the spines, and to create the 'forest floor' effect. I also made some cupcakes and decorated them green for 'grass'.
My score: 4/5 Reasonably tricky but well worth it :) A very Happy Birthday cake!
Julia's Top Tips
- DON'T make your hedgehog too tall - I did and it looked a bit bizarre (another reason for the cupcakes was to hide its height!) Trim a bit off your cake if it is looking too tall.
- You want a stiff buttercream so that the whole creation holds it shape - use a bit of extra icing sugar and store the finished cake in the fridge so the flakes don't fall out if soft icing!
- Don't worry if it looks a bit messy, it adds to the overall rustic woodland effect! ;)
Keeeeeep baking!


