Popular Posts

Tuesday, 30 August 2016

Week One, Part Two: Blueberry, Mint and Lime Drizzle Cake


This cake combines my favourite summer flavours, making a sweet, light, fresh taste.

This was MUCH easier than the jaffas - I'll be making this one again!


Full recipe here - http://www.mykitchentreasures.com/2013/09/blueberry-lime-and-mint-drizzle-cake.html

Ingredients
  • 115g very soft butter, plus extra for greasing
  • 25g fresh mint leaves 
  • 250g fresh blueberries
  • Finely grated zest and juice of 1 large lime (I would use 2 for a more zingy flavour)
  • 250g plain flour
  • 2 tsp baking powder
  • Pinch of salt
  • 225g caster sugar 
  • 2 large free-range eggs
  • 120ml whole milk
  • 25g desiccated coconut
  • 100g granulated sugar, plus extra for sprinkling


Method

Step One : Prepare the Ingredients

Preheat the oven to 180 (160 fan) and grease and line your loaf tin.


Finely chop the mint leaves (I used scissors) and mix 1 tbsp of the mint with the blueberries.  Pour over 1 tsp of lime juice (I would use more next time, the flavour's very subtle) and leave to infuse.    Sift the flour, baking powder and salt together.

Cream the butter and caster sugar until pale and fluffy (I used my trusty KitchenAid) then add the lime zest.  Add the eggs one at a time along with 2 spoons of the flour mixture each time.  This will stop the mixture curdling.  When it's smooth, fold in the coconut.  I didn't really taste the coconut, but I feel it contributed to the softness and moistness of the finished cake.


Step Two : Assembling the Cake

Spoon 1/3 of the cake mixture into the bottom of the tin, then sprinkle 1/3 of the blueberry, lime and mint mixture on top.  Repeat twice more, ending with the blueberries.  Bake for 60-70 minutes (check with a skewer - it should be clean)


Step Three: It's Drizzle Time!

Combine the rest of the mint with 2 tbsp of granulated sugar and grind into a paste using a pestle and mortar (or a rolling pin and a bowl!)  When the mixture resembles a paste, stir in the rest of the lime juice (remember, use 2 limes instead of 1) and leave to infuse.  When the cake comes out of the oven, let it cool for 5 mins, then use a thin skewer or a cocktail stick to poke holes through the cake.  Be careful to poke through the soft areas - if you poke through the crust it will leave a noticeable hole!  Strain the drizzle mixture through a sieve then mix with the rest of the granulated sugar.  BE PATIENT as you are drizzling - otherwise the mixture will not go into the cake but will instead go all over your worktop!  Leave the cake to cool before you remove it from the tin and paper.


My score: 4/5 - Nice, easy bake.  My only reason for not giving it 5/5 is that I don't feel the mint and lime came through enough on the first tasting.  A day later was a different story - fresh and zingy!  But if you're looking for strong flavours on the day, it needs a lot more lime and mint.  The coconut didn't come through at all, but I do feel it contributed to the overall texture of the cake.  

Julia's Top Tips
  • Use double the amount of lime and mint if you want a nice, strong flavour on the day of baking.
  • Experiment with the amounts of sugar to suit your own palate - I might use less next time.
  • Maybe bake it for slightly longer in a slightly cooler oven - was moist to the point of crumbling!
  • BE PATIENT with the drizzle - or all you will get is a sticky worktop!

Keeeeeeeep baking!


Week One : Jaffa Cakes


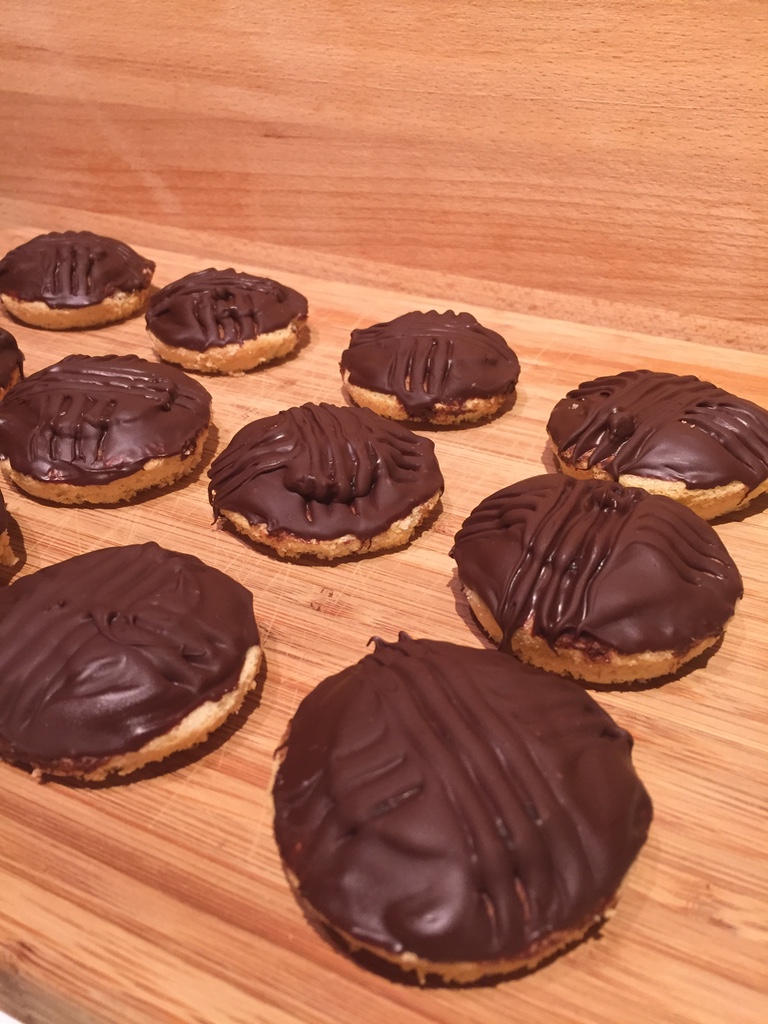
My husband has begged me since Wednesday (Bake Off night) to bake him some Jaffa cakes.  I wasted hours (Ok, 5 minutes) looking for vegetarian orange jelly - couldn't find it anywhere. So I gave up - these are NOT vegetarian friendly!

Prior warning - these are not an easy bake!  Very fiddly and time-consuming - I was ready to tear my hair out by the end!  Here are my step by step instructions with pics, hints and tips - so you can learn from my mistakes!


Full recipe here - http://www.bbc.co.uk/food/recipes/mary_berrys_jaffa_cakes_58695 


Ingredients


For the jelly

1 x 135g packet orange jelly

150ml/5fl oz boiling water 

1 small orange, finely grated zest only 


For the sponge

unsalted butter, for greasing 

1 large free-range egg

25g/1oz caster sugar

25g/1oz self-raising flour, sifted 


For the topping

180g/6¼oz plain chocolate 


Method

Step One : Make the Jelly


Make the jelly as per packet instructions.  I had to stir mine for a loooooooong time - I ended up popping it in the microwave for a few seconds to get the last bits.  Also, I didn't have an orange so I used two clementines instead!

Pour it into a tray to set.  I had a LOT of issues getting it out of the tray when it had set.  I've since googled the issue and a lot of people suggest wiping the tray with vegetable oil so it doesn't stick.

Step Two : Make the Sponge

First, preheat the oven to 180 (160 fan) and grease a bun tin.  I also added a sprinkle of sugar to help the cakes come out cleanly.  This worked well so I recommend you try it.


Then, whisk the egg and sugar until it is pale and fluffy (should look almost white).  I used my trusty mixer  (£5 from Sainsbury's!) to save my arm muscles!  After that, fold in the flour. (I always use a metal spoon to fold)


Use a FULL dessert spoon to fill each well in the bun tray (about 3/4 full), then smooth the tops.  Bake for about 7 minutes.  THEY WILL NOT GO GOLDEN BROWN so you do need to do the 'finger' test (sponge should bounce back when pressed lightly with a finger) and not rely on colour (mine were dry because I left them in too long).


Step Three : Jaffa Cakes - Assemble!

Welcome to the fiendishly difficult part!  Up to now it's been relatively straightforward.  The jelly and the chocolate are a NIGHTMARE.

I always melt my chocolate in the microwave.  Some people may find this daunting but the trick is to do it in quick blasts.  Break 2/3 of the chocolate into a bowl and melt in 20 second blasts, stirring in between.  When it's melted, add the remaining 1/3 of the chocolate and just stir - the remaining heat will melt the rest of the chocolate.  This reduces the risk of the chocolate spoiling and usually guarantees me a gorgeous shine.  Leave it to cool for a while until it is quite viscous.  Mine refused to thicken as it was so hot when I was making them.


My jelly was a DISASTER.  As I mentioned earlier, it stuck to the dish so I couldn't turn it out.  I was forced to cut the circles in the dish, which then meant they lost their shape as I transferred them onto my buns - very messy!  Definitely not the polished look I was going for!


Finally, spoon the chocolate onto the jaffa cakes and smooth carefully around.  I was NOT patient enough - my chocolate was still too runny and dribbled down the sides.  Also, I was forced to put my jaffas in the fridge to set as they refused to set at room temperature.  This meant they lost their beautiful shine and went misty.  The criss cross was a disaster too.  Again, I was impatient and dragged the fork across when it was still too wet, resulting in messy crosses.


My score: 1/5  This is far too difficult for the pay off involved.  They were absolutely delicious but frustrated me so much!  Don't do it.  Buy a pack instead! :)

Julia's Top Tips
  • Wipe your jelly dish with flavourless oil before you begin so that your jelly doesn't stick.
  • BE PATIENT - the chocolate will spread better if it's slightly cool and thicker.
  • Don't bother with the criss cross - it looks rubbish!
Keeeeeeeep baking!

Monday, 29 August 2016

Guess Who's Back... Back Again...

That's right everyone!  The Great British Bake Off has returned - and so have I!  I feel confident I can complete the challenge now - at least one bake from each Bake Off week!

Week One - Jaffa Cakes and Drizzle Cake!


Wednesday, 31 October 2012

Great British Bake Off Challenge - Week 4

White Chocolate Sacher Torte

I know it should be Week 3.... But I never got around to making my treacle tart, but I have made my torte, american pie and sponge puddings!

I used Mary Berry's Sacher Torte recipe, and just replaced the chocolate with white chocolate :)


Ingredients

For the topping and the icing

What to do...

  1. Preheat the oven to 180C/350F/Gas 4. Grease a deep 23cm/9in round cake tin then line the base with greaseproof paper.
  2. Melt the chocolate. Cream butter and sugar.  Add the cooled chocolate and the vanilla extract and beat again. Add the egg yolks, then fold in the ground almonds and flour
  3. Whisk the egg whites, then fold in chocolate mixture. Pour into tin.
  4. Bake in the oven for about 45-50 minutes, then cool.
  5. To make the topping, heat the apricot jam in a small pan and then brush onto cake.
  6. Heat the cream, then remove from heat and add the chocolate.  Mix until melted.  Wait for AGES until it is really thick, then pour onto cake.  (Don't get impatient like I did!)


Obviously this is the concise method.  If you want all the hints and tips, check out the full recipe.

Friday, 21 September 2012

Great British Bake Off Challenge No. 2 - Bagels!


I am a relative novice when it comes to bread - so far I've made 4 loaves of bread, 1 batch of white rolls, and 1 batch of wholemeal rolls!  But I vowed I would make one bake from each show, and bagels seemed easier than flatbreads or eight strand plaited madness!  Bagels always seemed so complicated to me, what with the boiling before baking, but they were actually easy peasy lemon squeezy!

Here is the full recipe....

And here is my simplified, Juliarised version :)

Ingredients:
  • 7g sachet yeast
  • 4 tbsp sugar
  • 2 tsp salt
  • 450g bread flour
Method:
  • Tip yeast and 1 tbsp of sugar into a bowl.  Cover with 100ml warm water.  Leave for 10 mins til frothy.
  • Pour 200ml warm water, then add salt and half the flour.  Add the rest of the flour in small amounts and keep mixing til you have a soft sticky dough.
  • Knead for 10 mins until the dough is smooth.  Shape into a bowl and leave in an oiled bowl.  Cover with cling film and leave to rise for 1 hr.
  • Heat oven to 200C.  Divide the dough into 10 pieces (abt 85g each).  Shape each piece into ball, then flatten with your palm. 
  • Now for the fun part!  Stick the handle of a wooden spoon into the middle of the ball, and spin!  You want to make the hole nice and big, abt 3-5 cm wide.
  • Boil water in a large pan and add the sugar.  Use a slotted ladle to drop bagels in (I managed to do 2 at a time).  Cook for 1-2 mins, turning over halfway through.  Set on clean tea towel to get rid of excess water.
  • Place on baking tray lined with baking parchment and bake for 20-25 mins.  Check your bottoms - you want to hear a hollow sound when you tap.
  • Enjoy with cream cheese or whatever your topping of choice is!
Upcoming challenges... Mary Berry's Treacle Tart!  White chocolate torte!  Mississsippi Mud Pie!  Sticky toffee pudding!

Tuesday, 11 September 2012

Great British Baking Challenge No 1 - Upside Down Cake!


Ok, I have decided to honour the 3rd annual Bake Off by trying at least one challenge from each show.  (I know I should do all 3 - but I have a life lol!)

This week, I attempted the signature bake from Week 1 - Upside Down Cake.

I decided to make Lorraine Pascale's Dulce and Banana Cake.

My first tip - never ever EVER leave your caramel for a SECOND let alone for several minutes while you search for your camera to take pictures!  I had a lovely burnt mess at the bottom of my pan lol!  However, apart from that one snaphoo, the rest of the bake was easy peasy simple pimple :)

This is my adapted recipe (I didn't have treacle, so I used golden syrup, and I didn't have wholemeal flour, so I just used all self raising.  I also had no light brown sugar, so I used dark.  Oh, also I had no salt!  Lol, it still came out fine)

Ingredients

For the sticky topping
For the sponge

Method

Grease and line a square tin.  Preheat the oven to 180C/350F/Gas 4.

For sticky toffee - Melt sugar and butter over medium heat.  When its all melted, whack up the heat and stir like crazy!  When its a nice light brown colour (and not burnt), pour it into your tin and tip to spread around.


For sponge - Cream together the butter and sugar. Add the eggs one at time, beating hard between each addition. Add vanilla.  Then fold in both flours, the baking powder, ginger, cinnamon, golden syrup.


Slice the bananas and arrange across tin.  Plop the cake mix on top and smooth. Pop it into the oven for about 35 minutes.  Check with a skewer.

Cool cake in the tin, then turn out onto a plate (Be brave - its better if its quick, just like a plaster lol!)  Take the tin off and peel off the baking parchment.


Cut into squares and eat straight away while its still warm and sticky and gooey!  YUM!

Very easy to make - I acheived it at 7pm on a Sunday evening!

Now come on GD staff, you know you need to comment if you want me to bring you goodies next week..... :)

Sunday, 2 September 2012

Who wants to be a millionnaire?


I loooooooooooooooooooooove Millionnaire's Shortbread!!  I love the chunky chocolate on top, the gooey, sticky caramel beneath, and the crunchy shortbread finish!  It's my absolute kryptonite, yum!

My favourite recipe is from my trusty sidekick 'Baking Magic'

First of all, you need to make the shortbread.


Ingredients


  • 250g butter
  • 50g caster sugar
  • 250g plain flour
  • 125g corn flour
Method

  1. Preheat oven to 170C/325F/Gas Mark 3.
  2. Cream the butter and sugar together until pale anf fluffy.
  3. Sift the flour and corn flour, then stir into butter mix until smooth and creamy.
  4. Press the mixture into your greased tin (size depends on how thick or thin you like your shortbread!)
  5. Prick with a fork, then bake for 20 mins until pale gold.  Cool in tin.


Next, you need to make the caramel.  This was my first time making caramel from scratch.  I didn't have any condensed milk so i used evaporated milk - and it worked perfectly!

Ingredients
  • 175g butter
  • 175g caster sugar
  • 4 tbsp golden sugar
  • 1 tin condensed (or evaporated) milk


Method
  1. Put all the ingredients in a pan and heat gently, whilst stirring.
  2. Once all the ingredients are melted, turn up the heat, and keep stirring while it bubbles.
  3. After about 5 minutes, it will be thick and golden.
  4. Pour over the cooled shortbread and leave for 30 mins to set.


Finally, melt 350g milk chocolate and spread it on top.  Immediately, before it has a chance to set, pipe melted white chocolate in lines in one direction across the top.  Get a cocktail stick, and drag the chocolate in alternative directions.


You have to do it v quick - as you can see I mucked up the middle one!